
The Heartbreaking Reality of a Crashed Photography Drone
Imagine saving up for months to finally buy that beautiful, high-end photography drone. You take it out to a stunning outdoor location, excited to capture breathtaking aerial photos. You turn on the controller, push the joysticks forward, and watch your expensive gadget lift into the sky.
But suddenly, something goes terribly wrong. Without any warning, the drone starts drifting uncontrollably to the left. You try to steer it back, but it completely ignores your commands. Within seconds, it smashes directly into a thick tree trunk and plummets to the hard concrete below.
The sickening sound of snapping plastic and shattering camera glass is a nightmare no one wants to experience. Sadly, this exact scenario happens to thousands of beginners every single day.
Why do so many new pilots face this expensive tragedy? Most of the time, it comes down to a lack of proper education and dangerous misinformation on the internet.
- Relying on outdated videos: Many beginners watch old internet tutorials that completely ignore modern software updates and sensor requirements.
- Skipping the boring steps: People often rush through the setup process because quick-start manuals do not explain the science behind why calibration matters.
- Trusting the autopilot blindly: There is a false belief that modern drones "fly themselves," leading pilots to ignore basic pre-flight safety checks.
- Dangerous calibration habits: Many users calibrate their drones indoors or near massive metal objects, which permanently confuses the internal compass.
- Misunderstanding warning signals: Vague instruction booklets leave pilots confused about what the flashing red or yellow lights actually mean.
This constant stream of bad information creates a heavy emotional toll. It does not just cost you money; it robs you of your peace of mind.
- Paralyzing fear: You might develop an intense fear of flying, leaving your expensive camera gear locked inside a dark closet forever.
- Loss of confidence: Your self-esteem takes a massive hit, making you too nervous to fly near water, mountains, or public spaces.
- Financial anxiety: The obsessive worry about paying for replacement parts like broken propellers, gimbals, or motors can ruin your day.
- Stifled creativity: The pure joy and creative freedom that originally inspired you to buy the device gets completely wiped out by stress.
When you lose trust in your equipment, photography stops being fun. You start sweating the moment the drone leaves the ground. We need to fix this problem right now so you can take back your confidence and fly with total peace of mind.

The Science of Safe Flights: Mastering Your Drone's Internal Brain
To stop crashes before they happen, we need to understand how your device actually thinks. A drone is not just a flying camera; it is a highly advanced flying computer.
Just like humans use their eyes and inner ears to stay balanced, your drone uses tiny internal sensors to understand its place in the sky. If these sensors are confused, the drone will fly into a wall.
Here is a step-by-step, science-backed guide to properly calibrating those sensors. If you follow these practical steps, you will instantly protect your investment and fly like a seasoned professional.
Resetting the Inertial Measurement Unit (IMU)
The Inertial Measurement Unit, or IMU, is the absolute heart of your drone's balancing system. You can think of it as the inner ear of the drone.
When you tilt your head, fluid in your inner ear tells your brain that you are leaning over. The IMU does the exact same thing for your drone using tiny electronic accelerometers and gyroscopes.
If the IMU is not calibrated correctly, the drone might think it is flying perfectly flat when it is actually tilted at a dangerous angle. To correct this imaginary tilt, the drone will automatically speed up certain propellers. This causes the dreaded "toilet bowl effect," where the drone violently spins in wider and wider circles until it crashes.
How to Calibrate Your IMU Properly
You do not need to calibrate the IMU before every single flight. However, you absolutely must do it when you first unbox the drone, after a hard landing, or after a major software update.
First, you need to find a surface that is perfectly flat and completely level. A slight slant in your table can ruin the entire process. I recommend using a standard spirit level tool on a wooden table to ensure it is completely flat.
Next, unfold the drone arms completely, but do not attach the propellers yet. Turn on the drone and connect it to your smartphone controller app.
Go into the safety settings menu and select "IMU Calibration." The screen will now ask you to place the drone in several different physical positions.
You will start by laying it flat on its belly. Then, you will turn it exactly on its right side, followed by its left side. You will also stand it up pointing towards the ceiling, and finally, point it down towards the ground.
Pro Tip: Wait for the green light on your screen before moving to the next position. Do not rush this process. By doing this carefully, you are teaching the drone exactly what "level" feels like from every possible 3D angle.
Perfecting the Compass Calibration
While the IMU handles physical balance, the internal compass handles geographical direction. The compass tells your drone exactly which way is North, South, East, and West.
This sensor works hand-in-hand with the GPS satellites orbiting in space. If the GPS says "fly straight home" but the compass is confused about where "straight" is, your drone will fly away into the distance. We call this a terrifying "flyaway" event.
Think of a confused hiker trying to find their way out of a dark forest. If their magnetic compass is broken, they will just walk in endless circles, no matter how hard they try to walk straight. Your drone acts the exact same way.
The Dangers of Magnetic Interference
The biggest enemy of a drone compass is invisible magnetic interference. Your drone's compass is incredibly sensitive, meaning everyday metal objects can completely blind it.
You should never calibrate your drone compass near a car, a metal park bench, or a concrete sidewalk containing steel rebar. Even the smartwatch on your wrist or the keys in your pocket can ruin the magnetic reading.
I once saw a beginner try to calibrate their drone on the hood of their truck. The massive amount of metal in the engine block permanently warped the compass data. The moment they took off, the drone darted sideways and hit a streetlamp.
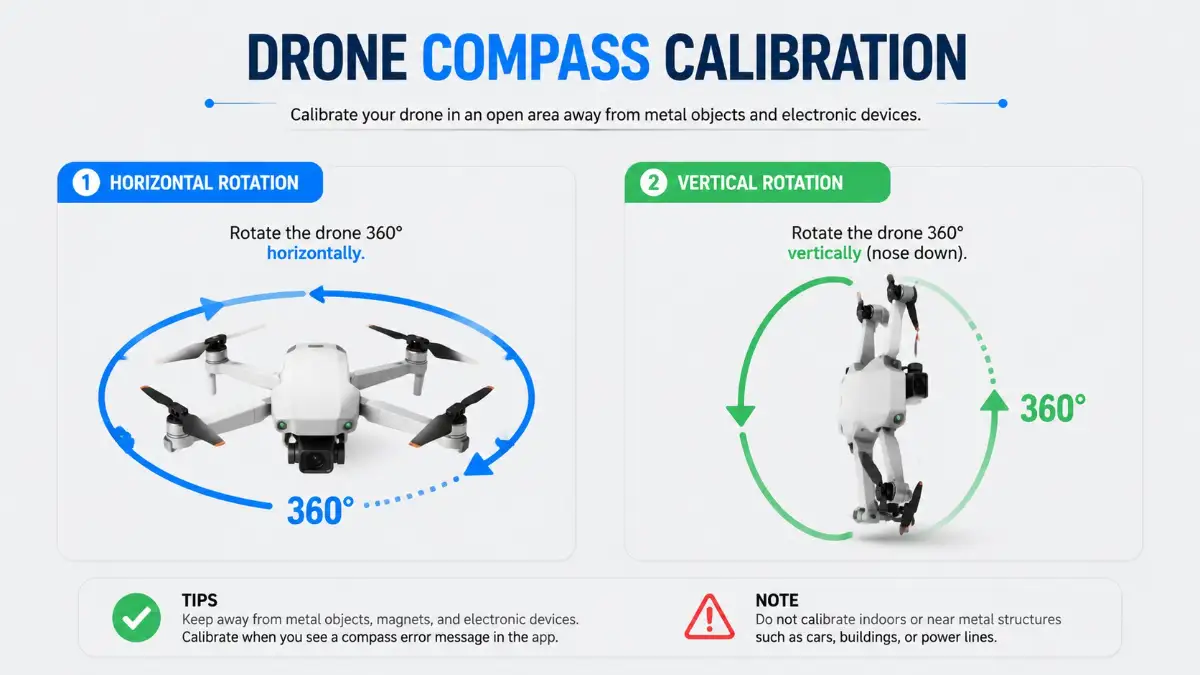
The Proper "Drone Dance" Technique
To get a perfect compass calibration, walk into the middle of a wide, open grassy field. Make sure you are at least fifty feet away from cars, buildings, and underground power lines.
Open your flight app and tap "Calibrate Compass." The app will ask you to perform a specific physical movement, which many pilots playfully call the "drone dance."
First, hold the drone flat in front of you, completely parallel to the ground. Slowly spin your own body around in a full 360-degree circle. Keep your hands steady.
Once the app beeps, point the nose of the drone straight down toward the grass. Now, spin your body around in another full 360-degree circle.
This simple horizontal and vertical rotation maps the local magnetic field. It takes less than sixty seconds to do, but it will absolutely save you hundreds of dollars in repair bills.
Gimbal Balancing for Cinematic Horizons
Now that the drone knows how to balance its body and find its direction, we need to focus on the camera itself. The camera gimbal is the mechanical arm that holds your lens perfectly steady while the drone shakes in the wind.
If your gimbal is poorly calibrated, your photos and videos will suffer from a slanted horizon. You will take a beautiful picture of the ocean, but the water will look like it is pouring out of the left side of the frame.
Think of the gimbal like a waiter trying to carry a tray full of water glasses on a moving train. The waiter's arm must constantly adjust to every bump and turn to keep the water from spilling. The gimbal motors make thousands of tiny adjustments every second to keep your camera perfectly flat.
Executing the Auto-Gimbal Calibration
Thankfully, fixing a slanted horizon is the easiest step in this entire guide. Most modern flight applications have an incredibly smart feature called "Auto-Calibrate Gimbal."
To do this, place your drone on a solid, flat surface on a calm day. Do not do this on soft grass, because a blade of grass might hit the camera lens and block its movement.
Go into your camera settings menu and hit the auto-calibrate button. The drone will suddenly start moving the camera lens on its own.
It will look left, look right, point up, and point straight down. It might also make some strange robotic humming noises. This is completely normal and means the motors are finding their natural center point.
Do not touch the drone or bump the table while this is happening. Let the internal software do all the heavy lifting. Once it finishes, your camera will be perfectly level, ensuring your sunset photos look incredibly professional.
Developing a Pre-Flight Mental Checklist
Knowing how to calibrate is highly important, but knowing when to do it is what separates amateurs from experts. You need to build a mental checklist that you follow every single time you open your carrying case.
Whenever you travel to a new city or drive more than fifty miles away from your last flying spot, you should recalibrate your compass. The Earth's magnetic field changes depending on your geographic location.
Always check your controller screen for any red or yellow warning text before you push the start button. If the app suggests a compass or IMU check, never swipe it away. Take the extra three minutes to do the calibration.
Those three minutes of patience are the best insurance policy you will ever have. It ensures you will return home with amazing footage and a completely undamaged drone.
Moving Beyond the Basics: Pro Secrets for Flawless Flights
We already covered the main balancing and directional sensors that keep your device safely in the air. However, protecting your expensive camera requires a few extra steps that most beginners completely ignore.
If you want to fly like a true professional, you need to understand the deeper safety systems built into your equipment. These advanced calibration tricks will save you from hidden dangers you might not even see coming.
Think of these final steps as an extra insurance policy for your peace of mind. Let us break down exactly how to keep your flying camera in perfect, crash-free condition.
Tuning the Obstacle Avoidance Vision Sensors
Modern flying cameras have tiny lenses scattered all over their plastic bodies. These are known as vision sensors, and they act as the eyes of your device.
These electronic eyes constantly scan the environment looking for tree branches, brick walls, and power lines. If the drone flies too close to a solid object, the vision sensors tell the brakes to engage immediately.
But what happens if those electronic eyes are blurry or misaligned? Your device might think a brick wall is ten feet away when it is actually only two feet away. This exact miscalculation is how most automated crashes happen during return-to-home sequences.
How to Calibrate Your Drone's Vision Sensors
Unlike the compass, you cannot calibrate vision sensors standing in a grassy field. You actually need to use your computer screen to fix this system properly.
First, download the official assistant software from your manufacturer's website onto your laptop. Connect your powered-off device to the computer using a high-quality USB cable.
Turn the power on and open the software. Click on the "Calibration" tab, and your computer monitor will display a special grid pattern filled with black and white dots.
You will physically pick up the drone and point its front, bottom, and rear sensors directly at your computer screen. The software will ask you to tilt the device up, down, left, and right to follow specific boxes on the screen.
This process trains the electronic eyes to measure distance and depth accurately. I highly recommend doing this once every few months or anytime you accidentally bump the drone into a hard surface.
Aligning Your Remote Controller Joysticks
Sometimes the drone is perfectly healthy, but the remote controller is secretly sending bad commands. This issue is called joystick drift, and it can be incredibly frustrating.
Imagine driving a car down a straight highway, but the steering wheel keeps pulling heavily to the left. You have to constantly fight the wheel just to stay in your lane.
Joystick drift does the exact same thing to your flight experience. You might take your hands off the controller, expecting the drone to hover perfectly still. Instead, it slowly drifts sideways into a nearby bush because the joystick is not resting in its true center.
The RC Calibration Process
Fixing this annoying drift only takes about two minutes. Turn off the actual drone, but leave your remote controller and smartphone app turned on.
Go into the control settings menu on your app and select "RC Calibration." The screen will show two digital circles representing your physical joysticks.
Move both joysticks in wide, full circles several times. Push them as far forward, backward, left, and right as they can possibly go.
Finally, let go of the sticks completely so they snap back to the middle. The software will memorize this resting position as the absolute center point. Now, when you let go of the sticks outdoors, your device will brake instantly and hover like a rock.
Smart Storage Habits for Long-Term Sensor Health
Calibration is not just about pressing buttons on an app; it is also about how you treat the equipment at home. Poor storage habits can silently ruin your internal compass over time.
Many people throw their carrying cases onto a desk right next to large computer speakers or a television. Those speakers contain massive magnets that emit invisible magnetic fields.
If your drone sits next to a heavy magnet for a week, the internal compass will become permanently magnetized. The next time you try to fly, the app will throw constant compass errors that no amount of field calibration can fix.
Always store your gear in a cool, dry closet far away from heavy electronics, subwoofers, and thick metal toolboxes. Treating your equipment nicely at home ensures it performs beautifully when you take it outdoors.
Dangerous Calibration Habits That Will Ruin Your Drone
Even if you know how to calibrate your systems, doing it in the wrong environment can cause massive problems. I see beginners making the same expensive mistakes over and over again.
If you want to keep your camera safe, you must actively avoid these five dangerous pitfalls. Ignoring these warnings will eventually lead to a completely avoidable crash.
1. Calibrating Indoors or on Concrete Surfaces
The single biggest mistake you can make is trying to calibrate your compass inside your house or apartment. Modern buildings are constructed with thick steel rebar hidden inside the walls and concrete floors.
This hidden metal acts like a giant magnetic cage, completely confusing the sensitive sensors. If you calibrate indoors, the drone learns a corrupted version of North and South.
The same rule applies to concrete driveways and city sidewalks. Always find a natural dirt path, a wooden deck, or an open grass field to perform your setup routine.
2. Ignoring Firmware Updates Before Calibrating
Calibration is a software process, which means the software needs to be completely up to date to work correctly. Manufacturers frequently release patches to fix bugs in the sensor logic.
If you try to calibrate a machine running old, buggy firmware, the process might freeze or fail completely.
Always check your app for updates while you are connected to home Wi-Fi. Update the main brain, the controller, and the batteries before you ever start the physical calibration dance.
3. Rushing the IMU Setup on Uneven Ground
As we discussed earlier, the IMU teaches your device what "perfectly flat" feels like. If you set the machine on a slanted park bench during this process, you are teaching it the wrong angle.
When you take off, the drone will immediately lean sideways to match the slanted angle it just learned. You will spend the entire flight fighting the sticks to keep the camera level.
Never use the hood of your car, a rocky dirt patch, or your backpack as a calibration surface. If you are outdoors, bring a small, rigid piece of wood or a flat plastic landing pad to use as your dedicated workspace.
4. Leaving Propellers Attached During Maintenance
When calibrating the internal IMU, the drone needs to be absolutely still. Even the slightest vibration can ruin the sensitive gyroscope readings.
If you leave the plastic propellers attached, a light breeze can catch the blades and cause the drone body to wiggle. This microscopic wiggling is enough to fail the calibration process entirely.
Always remove all four propellers before you start pressing buttons in the safety menu. It only takes a few seconds to pop them off, and it guarantees a perfectly clean reading.
5. Wearing Magnetic Accessories on Your Wrists
You might be standing in a perfectly clear field away from all metal buildings, but you could still be carrying magnetic interference. Many modern smartwatches use strong magnetic clasps on their bands.
When you hold the drone to spin it around for a compass check, your wrist comes within an inch of the internal sensor. That tiny watch magnet is strong enough to completely blind the compass.
The same issue happens with cell phones in your front pocket or metal car keys swinging on your belt. Take off your smartwatch and leave your keys on the ground a few feet away before you start spinning the device.
Take Control of the Skies With Total Confidence
Flying a flying camera should never feel like a stressful, nerve-wracking chore. It should be a deeply rewarding experience that lets you capture the world from amazing new heights.
When you understand how your machine thinks and operates, that heavy anxiety completely disappears. You no longer have to cross your fingers and hope the drone decides to fly straight.
By taking just a few minutes to reset your compass, balance your IMU, and align your gimbal, you take total control over your equipment. You are actively preventing crashes before the motors even spin up.
Your Actionable Pre-Flight Checklist
To make this process as easy as possible, I want you to memorize this simple, straightforward routine. Use this mental checklist every single time you head out for a creative session.
- Check the location: Am I at least fifty miles away from my last flying spot? If yes, it is time for a new compass calibration.
- Check your pockets: Did I take off my smartwatch and put my heavy metal keys away?
- Check the ground: Am I standing on natural grass or dirt, far away from hidden concrete rebar and parked cars?
- Check the app warnings: Are there any yellow or red messages on my screen asking for an IMU reset?
- Check the camera horizon: Does the video feed look perfectly flat, or do I need to run a quick auto-gimbal reset on my flat landing pad?
The Joy of Safe Aerial Photography
Once you build these simple habits into your routine, they will become second nature. You will not even have to think about them anymore.
Instead of sweating and worrying about expensive repair bills, you can focus entirely on your creative vision. You can confidently fly over lakes, through mountain valleys, and across beautiful forests without a single drop of fear.
Knowledge is the absolute best tool you can put in your camera bag. Now that you know exactly how to manage your internal sensors, it is time to grab your gear, head outside, and capture some truly stunning aerial footage safely.
